🕸 The Open Deception Framework (ODF)
🐍 Series: Deception Security | Arc: 0
🕸 Outsmarting Attackers with Their Own Curiosity
Most security tools are reactive – they detect an attack and try to stop it.
Deception security flips that idea on its head. Instead of waiting, you create bait that looks valuable but is actually a trap. When an attacker interacts with it, you collect intelligence about their methods, tools, and even their identity.
What is Deception Security?
Deception means planting false assets in your network. Fake passwords, decoy files, or an entire fake server (honeypot). The attacker thinks they’ve found something worth stealing, but in reality, they’ve entered a controlled environment where everything they do is monitored.
Why Use It?
- Early warning: Detect attackers before they touch real systems.
- Intel gathering: Learn their Tactics, Techniques, and Procedures (TTPs).
- Low risk: If built properly, nothing in the deception environment can harm you.
The Open Deception Framework (ODF)
ODF is a simple, open, and free method anyone can use to set up deception tools. It works in four phases:
- Lure: Create believable fake data or systems.
- Capture: Use honeypots or tracking tokens to record intruder activity.
- Isolation: Keep the trap separate from real networks.
- Analysis: Review logs, extract indicators of compromise (IOCs), and map them to frameworks such as MITRE ATT&CK.
🗺 Tactical Brief and Map: Territory
Mission
Lure hostile actors into controlled traps.
Extract intelligence without exposing real systems.
Mission Objectives
- Deploy convincing fake assets to attract intrusion attempts.
- Capture all attacker actions in a monitored, quarantined environment.
- Prevent any path from the trap to production or sensitive data.
- Analyse collected data to identify tactics, techniques, and procedures.
- Feed intelligence back into defensive strategies.
Prior Threats (Relevant CVEs)
- CVE-2022-44877 – Unauthenticated RCE in Control Web Panel, often exploited via internet-facing admin panels posing as “low-value” systems.
- CVE-2020-5902 – BIG-IP TMUI RCE, showing how attackers pivot through seemingly peripheral assets.
- CVE-2019-0708 – “BlueKeep” RDP flaw, exploited during early-stage scanning before payload delivery.
- CVE-2018-15473 – OpenSSH user enumeration, leveraged for targeted brute force campaigns.
- CVE-2017-0144 – EternalBlue SMB exploit, a reminder that even bait systems must be patched to avoid becoming a real compromise point.
Tools
- Cowrie – SSH/Telnet honeypot for command and credential logging.
- Canarytokens – Trackable fake files, URLs, and keys.
- Wireshark – Deep packet inspection inside the isolated network.
- Syslog-ng or local logging tools – For secure, offline log storage.
Map
🧪 Playbook: Step-by-Step
🧭 Objectives:
Before deploying the Open Deception Framework (ODF), we must confirm:
- We are on the correct VPS.
- The system meets requirements (Ubuntu 22.04 minimal install, static IP).
- We have root or
sudoprivileges. - We understand this is an operational deception environment and all attacker activity happens in an isolated, quarantined segment.
Confirm VPS Environment
Check:
- Linux distribution & version (
hostnamectl). - Architecture & kernel version.
- Network reachability.
🧪 Why: Some deception configurations such as honeypot binding and packet capture require certain kernel modules or IP bindings.
Tools
We will be installing:
- UFW: Firewall control for perimeter filtering.
- Cowrie: SSH/Telnet honeypot to log attacker commands.
- Tcpdump: Network packet capture for forensics.
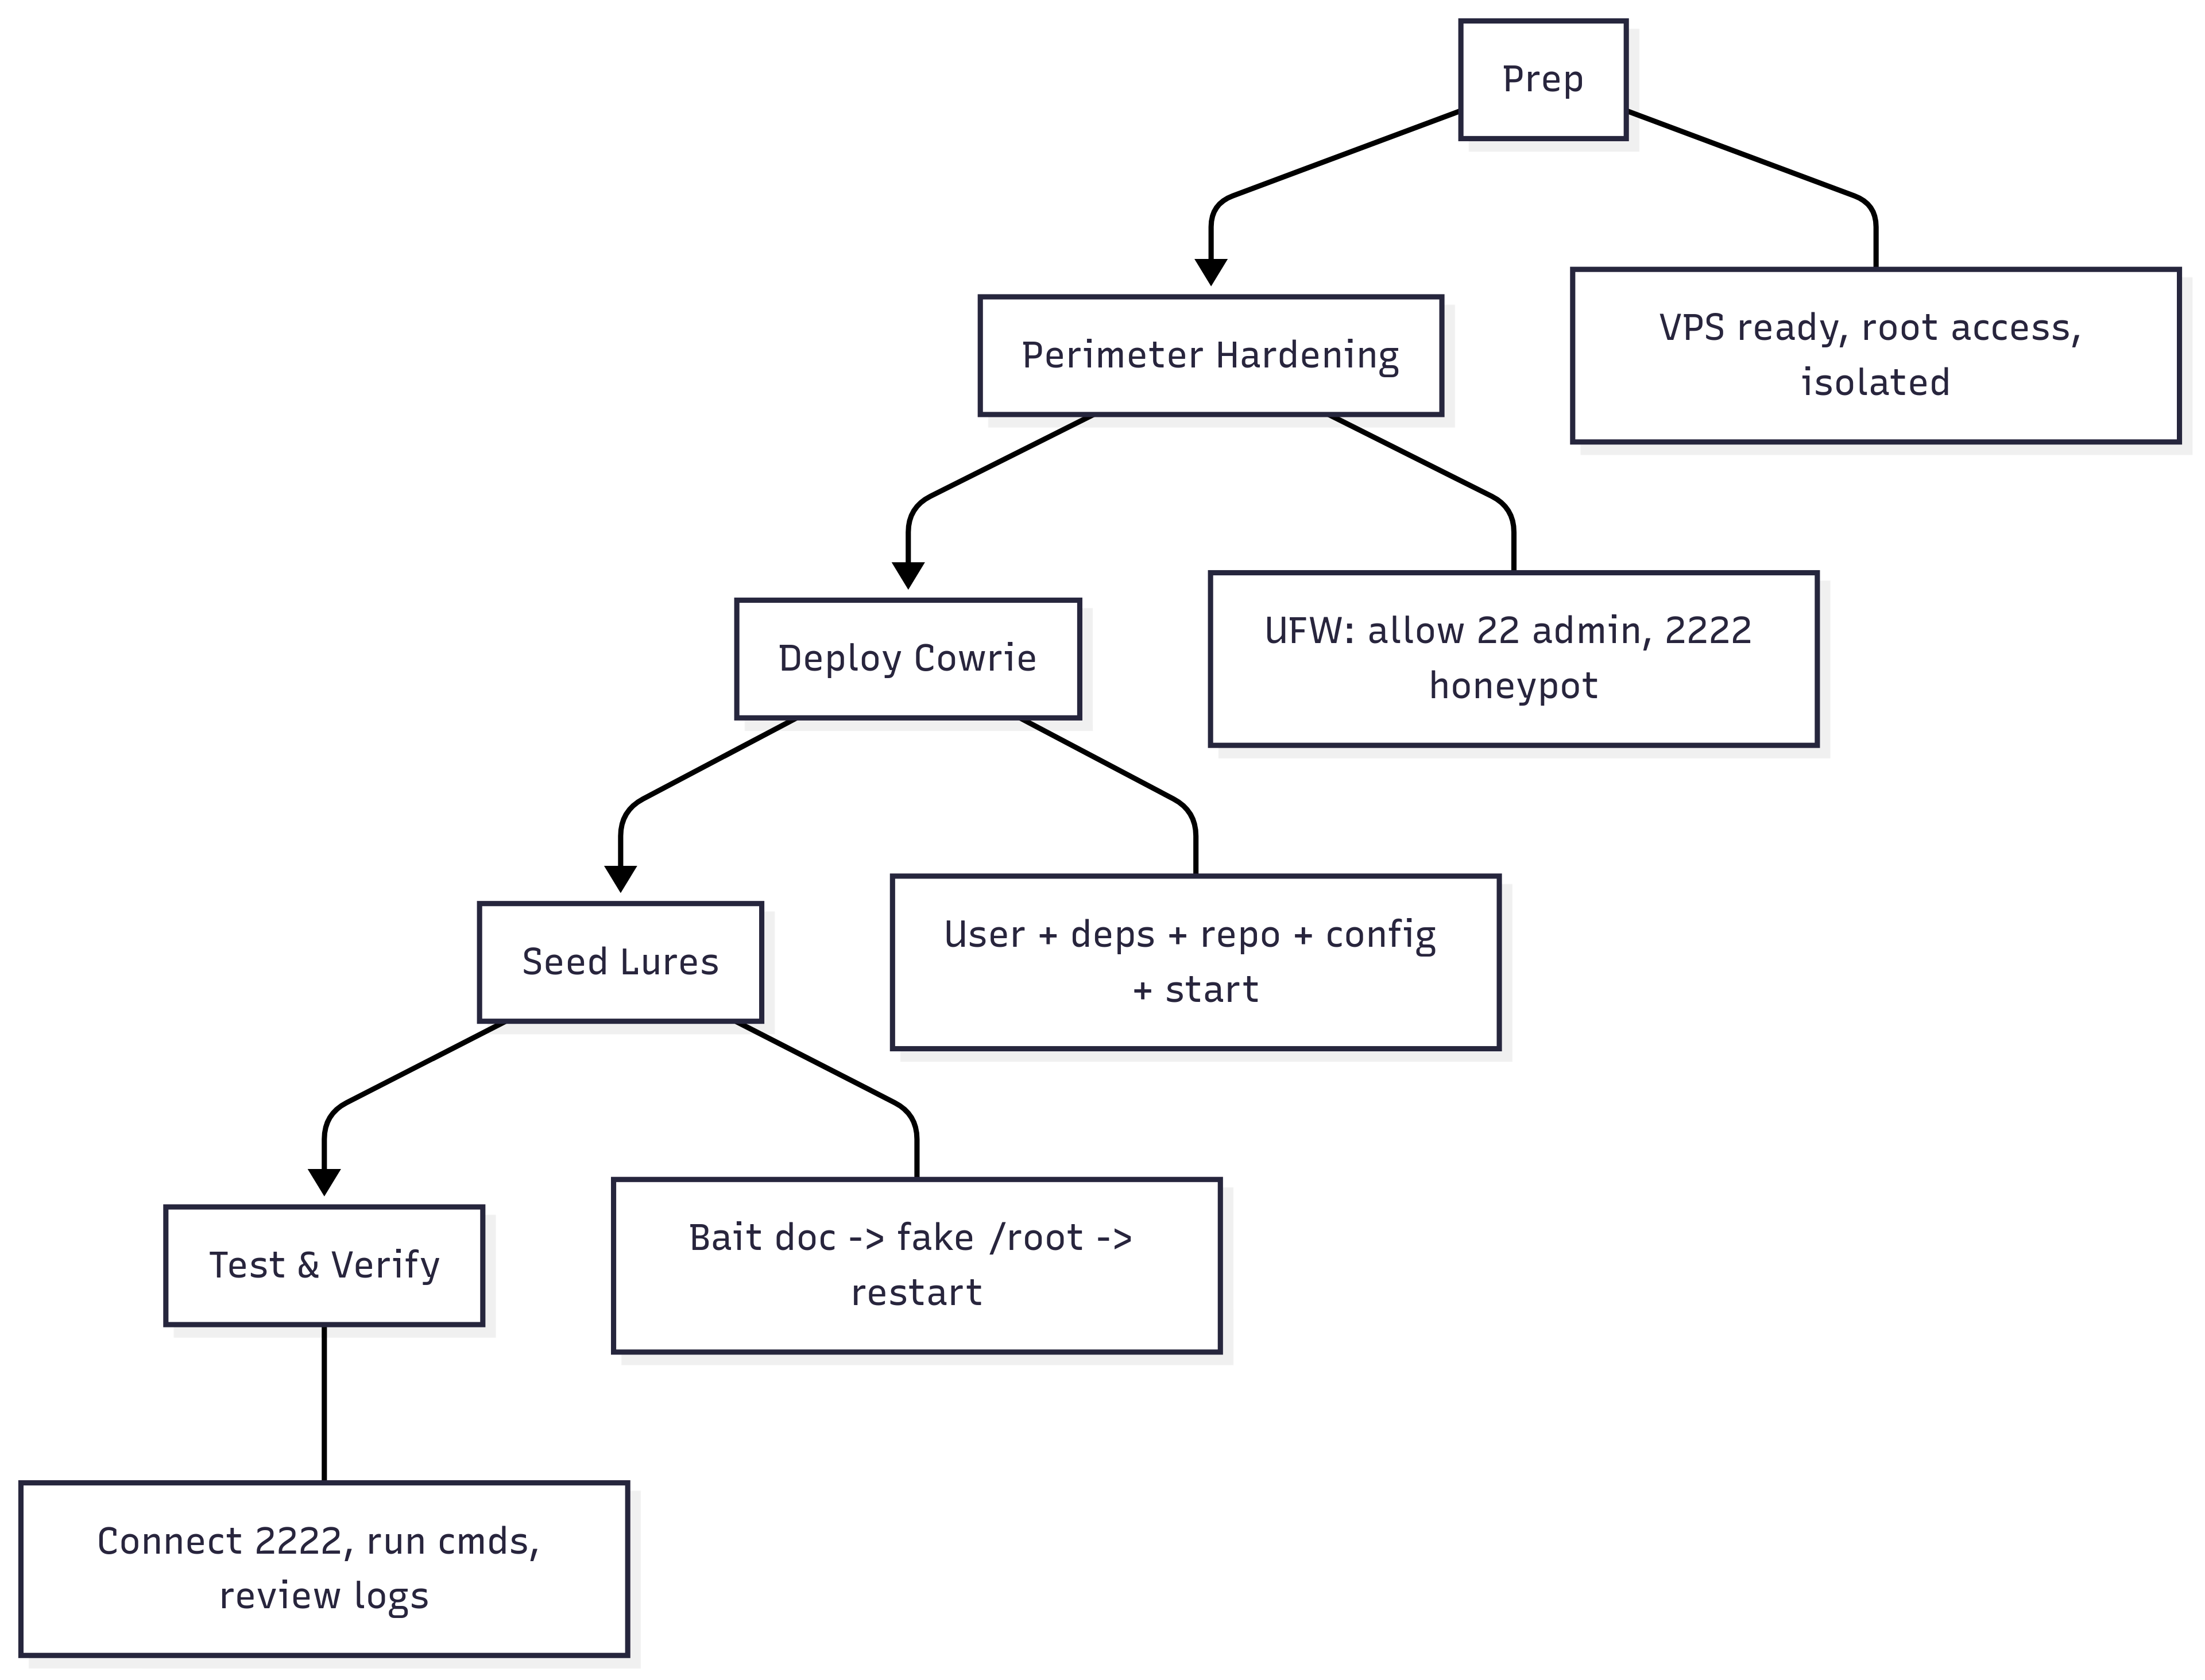
SECTION 1: Perimeter Hardening
We toughen the deception perimeter, locking down admin access, controlling ingress, and isolating the honeypot behind a controlled firewall.
Step 1: Firewall Setup (UFW)
- Default deny inbound, allow outbound.
- Open:
- Port 22 → Admin SSH
- Port 2222 → Honeypot SSH
🧪 Why: Control ingress and ensure honeypot is isolated from real admin access.
SECTION 2: Deploying the Honeypot (Cowrie)
We deploy the Cowrie honeypot, isolating it from production and preparing it to log attacker activity.
Step 1: Create Dedicated User
- Run Cowrie under a non-privileged account for security.
Step 2: Install Dependencies
- Python, Git, build tools, and libraries required by Cowrie.
Step 3: Clone & Setup Cowrie
- Get the Cowrie source.
- Create a virtual environment.
- Install dependencies.
Step 4: Configure Cowrie
- Bind SSH honeypot to port 2222.
- Avoid binding to port 22 — preserve it for admin access.
Step 5: Start & Verify
- Start Cowrie.
- Check running status.
SECTION 3: Seeding the Lures
Now we plant the bait – tempting files designed to attract attacker curiosity and trigger forensic alerts.
Step 1: Craft the Bait Document
- You can either:
- Create a placeholder text file as a proof-of-concept.
- Or prepare a more convincing Word document manually.
- Why: A believable file name and format increases the likelihood that an attacker will open it, activating logging or token triggers.
Step 2: Place the Bait in Cowrie’s Fake Root
- Cowrie simulates a filesystem for attackers.
- Placing bait in
/rootincreases its visibility during an attacker’s reconnaissance.
Step 3: Activate the Lure
- Restart Cowrie so it loads the updated fake filesystem containing the bait file.
- Why: Without a restart, new files won’t appear in the honeypot’s virtual environment.
Final Step: Logout
Once the perimeter is secured, the honeypot is live, and lures are seeded — exit the session. Your deception environment is armed, isolated, and ready to receive its first visitors.
🏅 Summary: What You’ve Achieved
- Firewall: Active, allowing only admin SSH (22) and honeypot SSH (2222).
- Honeypot: Cowrie deployed and operational, capturing all attacker commands.
- Lures: Bait documents seeded in the fake filesystem, ready to trigger alerts.
- Network Capture: Tcpdump ready for on-demand forensic collection.
- Isolation: Admin access protected, honeypot contained in a controlled environment.
👻 Your VPS is now armed, isolated, and primed for deception operations.
🪄 Runbook: Commands
SECTION 1: Perimeter Hardening
- Hostname
- hostnamectl
- UFW
sudo apt updatesudo apt install ufw -ysudo ufw default deny incomingsudo ufw default allow outgoingsudo ufw allow 22/tcp comment 'Admin SSH Access'sudo ufw allow 2222/tcp comment 'Honeypot SSH'sudo ufw enablesudo ufw status verbose
SECTION 2: Deploying Cowrie
- Create a dedicated, non-login user to run Cowrie securely and install dependencies
sudo adduser --disabled-password cowriesudo apt install python3-venv python3-pip git libssl-dev libffi-dev build-essential libpython3-dev authbind -y
- Clone the Cowrie honeypot source and create a Python virtual environment for Cowrie to isolate dependencies, configure
sudo -u cowrie git clone https://github.com/cowrie/cowrie.git /home/cowrie/cowriesudo -u cowrie python3 -m venv /home/cowrie/cowrie/cowrie-envsudo -u cowrie /home/cowrie/cowrie/cowrie-env/bin/pip install --upgrade pipsudo -u cowrie /home/cowrie/cowrie/cowrie-env/bin/pip install -r /home/cowrie/cowrie/requirements.txtsudo -u cowrie cp /home/cowrie/cowrie/etc/cowrie.cfg.dist /home/cowrie/cowrie/etc/cowrie.cfg
- Copy config from template if missing or empty
sudo -u cowrie bash -lc '[[ -s /home/cowrie/cowrie/etc/cowrie.cfg ]] || cp /home/cowrie/cowrie/etc/cowrie.cfg.dist /home/cowrie/cowrie/etc/cowrie.cfg'
- Change listen port to 2222
sudo -u cowrie bash -lc "CFG=/home/cowrie/cowrie/etc/cowrie.cfgsed -i 's/^[#[:space:]]*listen_port.*/listen_port = 2222/' \"\$CFG\" || truesed -i 's@listen_endpoints.*@listen_endpoints = tcp:2222:interface=0.0.0.0@' \"\$CFG\" || true "
- Open file to check manually
sudo -u cowrie nano /home/cowrie/cowrie/etc/cowrie.cfg
- Restart Cowrie
sudo -u cowrie /home/cowrie/cowrie/bin/cowrie restartsudo -u cowrie /home/cowrie/cowrie/bin/cowrie status
- Verify port 2222 is listening
sudo ss -ltnp | grep 2222 || sudo netstat -ltnp | grep 2222
SECTION 3: Seeding Lures
- Create placeholder bait document, or make one in Word and copy it across
echo "This is a test bait document" > bait.docx
- Copy
bait.docxinto Cowrie’s fake/rootfoldersudo mkdir -p /home/cowrie/cowrie/src/cowrie/data/fs/rootsudo cp bait.docx /home/cowrie/cowrie/src/cowrie/data/fs/root/
- Restart Cowrie to ensure changes take effect
sudo -u cowrie /home/cowrie/cowrie/bin/cowrie restart
SECTION 4: Testing the Trap
- Try logging in as an intruder
- ssh -p 2222 randomuser@<your-vps-ip>
- ls /home/cowrie/cowrie/log/tty/
LOGOUT
🔮 Coming up next…
Adaptive Trap Engineering
With your honeypot live and lures deployed, we move into dynamic deception — continuously reshaping the bait landscape to keep adversaries hooked and bleeding intelligence.
By the end of this phase, your ODF will:
- Randomise: Lure sets, filenames, and metadata on schedule.
- Mimic: Authentic system behaviours to extend attacker dwell time.
- Harvest: Deeper tradecraft for richer offline analysis.
Next, we evolve your trap from a static snare into a living, adaptive deception platform.